SUBHEAD: Fermenting is one of the traditional techniques for storage of perishable foods along with pickling. etc.
By Juan Wilson on 17 February 2014 for Island Breath -
(http://islandbreath.blogspot.com/2014/02/making-sauerkraut-at-home.html)

Image above: Preparing to cook a lunch with nitrate free hotdogs and home made sauerkraut, Photo by Juan Wilson.
Since first writing about making a "faux" sauerkraut from green papaya in 2009 I have done a few experiments with fermenting cabbage the old fashioned way - in a crock with salted water. Last year I acquired a 5quart crock online and fermented a few of batches.
The fermenting process is one of live anaerobic bacterial growth that has been used for thousands of years to process and preserve food. Live cultures have become of interest as part of a healthy diet as well.
Also fermenting is one of the traditional techniques for long storage of foods along with pickling, canning, salting, drying, dehydrating, smoking, etc. All are low technology ways of flavoring and storing perishable foods.
In one fermentation I started in January, 2014, used not only traditional white cabbage but also mixed in red cabbage and a local bok choy. It fermented for four weeks and came out a pretty pink. It was delicious but the bok choy was softer than I liked.
In late May I did another batch with the red cabbage and without the bok choy and was very happy with the result. My ratio was about four white cabbage to one red.
I saved all the extra juice that wouldn't fit in the jars of sauerkraut and after tasting it once found it a tonic. The fermented kraut juice seemed healthfully delicious - restorative like carrot juice seemed.
In late June I decided to do a larger batch of (nine quarts) and decided to let it ferment longer - a bit over six weeks. It was delicious but was, like the first batch, softer than I liked. Also, because these krauts were fermented, but not pasteurized, they do have a shelf life.
That last batch I finished in August kept on fermenting. Before I finished the last two quarts, towards mid fall, the kraut had softened too much to be a pleasure. I gave the remainder to our chickens - who eagerly devoured it.

Image above: White cabbage halved and cored. Photo by Juan Wilson.
That was then, this is now
So now I've gone back to the smaller batch with a four week fermentation - and this time with only the harder white cabbage. The three cabbages I chose at the market were each about two pounds.
To make this sauerkraut I pealed off the outer couple of layers of "flabby" leaves on the cabbages. This is to get to the crisper greener leaves. I then cut the cabbages in half and "cored" them in two cuts that remove the fibrous heart.
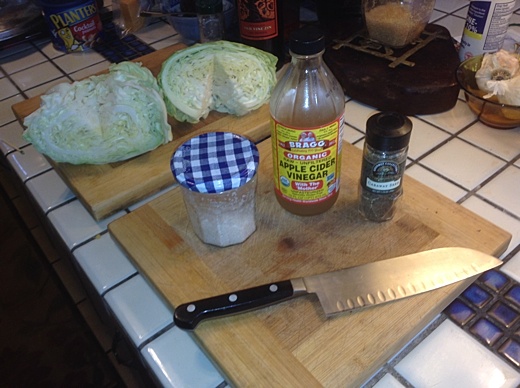
Image above: Ingredients for sauerkraut. Photo by Juan Wilson.
The rest ingredients for this sauerkraut included cabbage, water, vinegar and salt with a sprinkle of caraway seed (or other spice).
Author's note on 8 October 2014: Since this early batch of sauerkraut I have dropped the caraway seeds and added powrered ginger and garlic to the recipe. Since I wrote this article I tried adding other vegetables to the fermentation (see http://islandbreath.blogspot.com/2014/03/sauerkimchi-recipe.html). I particularly liked the flavor of fermented chayote and daikon radishes in the SauerKimchee recipe. I also liked the flavor of the ginger, Hawaiian pepper oil and garlic addition. However the carrots (and in another experiment) bitter melon were not to my liking. My recommendations, as an adjustments to this sauerkraut recipe would be to add the chayote and daikon and when fully fermented to separate the cabbage sauerkraut from daikon and chayote. Store the daikon and chayote in their own jars with fermentation juice for a pickley treat. So in summery my ingredients list now is:By Juan Wilson on 17 February 2014 for Island Breath -
(http://islandbreath.blogspot.com/2014/02/making-sauerkraut-at-home.html)
Image above: Preparing to cook a lunch with nitrate free hotdogs and home made sauerkraut, Photo by Juan Wilson.
Since first writing about making a "faux" sauerkraut from green papaya in 2009 I have done a few experiments with fermenting cabbage the old fashioned way - in a crock with salted water. Last year I acquired a 5quart crock online and fermented a few of batches.
The fermenting process is one of live anaerobic bacterial growth that has been used for thousands of years to process and preserve food. Live cultures have become of interest as part of a healthy diet as well.
Also fermenting is one of the traditional techniques for long storage of foods along with pickling, canning, salting, drying, dehydrating, smoking, etc. All are low technology ways of flavoring and storing perishable foods.
In one fermentation I started in January, 2014, used not only traditional white cabbage but also mixed in red cabbage and a local bok choy. It fermented for four weeks and came out a pretty pink. It was delicious but the bok choy was softer than I liked.
In late May I did another batch with the red cabbage and without the bok choy and was very happy with the result. My ratio was about four white cabbage to one red.
I saved all the extra juice that wouldn't fit in the jars of sauerkraut and after tasting it once found it a tonic. The fermented kraut juice seemed healthfully delicious - restorative like carrot juice seemed.
In late June I decided to do a larger batch of (nine quarts) and decided to let it ferment longer - a bit over six weeks. It was delicious but was, like the first batch, softer than I liked. Also, because these krauts were fermented, but not pasteurized, they do have a shelf life.
That last batch I finished in August kept on fermenting. Before I finished the last two quarts, towards mid fall, the kraut had softened too much to be a pleasure. I gave the remainder to our chickens - who eagerly devoured it.
Image above: White cabbage halved and cored. Photo by Juan Wilson.
That was then, this is now
So now I've gone back to the smaller batch with a four week fermentation - and this time with only the harder white cabbage. The three cabbages I chose at the market were each about two pounds.
To make this sauerkraut I pealed off the outer couple of layers of "flabby" leaves on the cabbages. This is to get to the crisper greener leaves. I then cut the cabbages in half and "cored" them in two cuts that remove the fibrous heart.
Image above: Ingredients for sauerkraut. Photo by Juan Wilson.
The rest ingredients for this sauerkraut included cabbage, water, vinegar and salt with a sprinkle of caraway seed (or other spice).
INGREDIENTS:
• Three 2 pound white cabbages (~$1.60 a pound)
• A few quarts of tap or filtered water
• Three tablespoons of raw unpasteurized apple cider vinegar
• Three tablespoons of sea salt
• One tablespoon of caraway seeds
• Three 2 pound white cabbagesHawaiian pepper oil is a mix of Hawaiian red peppers, seas salt, raw unpasteurized apple cider vinegar, and extra virgin olive oil that can sit for months and stay hot and tasty in a jar.
• Optional - 2 large Chinese daikon radishes - cleaned, trimmed, and sliced
• Optional - 3 medium sized chayote - cleaned, trimmed, and sliced
• No caraway seeds
• No carrots
• 2 tsps ginger powder
• 2 tsps garlic powder
• 1/4 tsps Hawaiian pepper oil (you'll have to determine your tolerance)
• Three tablespoons of raw unpasteurized apple cider vinegar
• A few quarts of water - enough to top vegetables in crock
• Three tablespoons of sea salt (dissolve salt in water before adding)
Yields Four quarts sauerkraut (with juice) and one extra quart juice. The vinegar I used is Bragg's raw organic apple cider vinegar that is unpasteurized. It is widely available on Kauai at Big Save and other supermarkets and health food stores.
The salt I uses was local salt. My wife and I were privileged to join a Hawaiian family in preparing beds and gathering salt and Salt Pond in Hanapepe several years ago and we have used the results cooking since. I think sea salt is better tasting and works better than iodized salt.
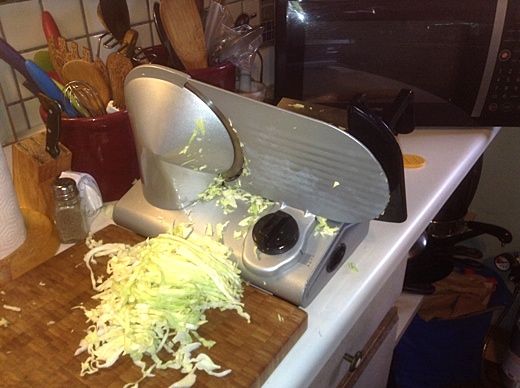
Image above: Shredding the cabbage. Photo by Juan Wilson.
When making several quarts of sauerkraut you will have to finely shred several cabbages. At first I tried a manual perforated steel shredder I usually use on cheese or a carrot. That did not suffice for cabbage. Cutting cabbage in less than eighth inch slices and cross cutting with a knife is difficult and time consuming.
To handle this, and others cooking tasks, I bought a slicer. Using the meat slicer to shred the cabbage is fast and results in uniform consistency for the kraut. I set the slicer to about an eighth inch slice.
To get the slicer I used see:I sliced the cored cabbage halves by putting a flat cut face to the slicing blade. You want to starting on the flat cut side to keep the cuts perpendicular to the grain of cabbage.
(http://www.amazon.com/Continental-PS77711-Professional-Series-Slicer/dp/B00196VYY0/)
About $70.
Towards the end to avoid oblique cuts (and to keep fingers from getting sliced) I cease cutting on the machine and use the remaining cabbage butts for other purposes.
Depending on the length of the sliced cabbage strands I usually to a little bit of cross cutting on the chopping board before putting the shredded cabbage in the crock.
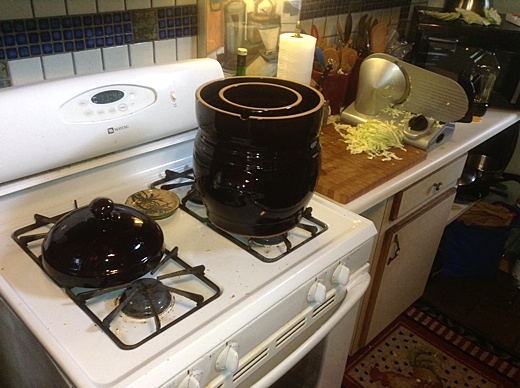
Image above: Putting cabbage in the crock. Photo by Juan Wilson.
The vessel I used for the sauerkraut fermentation is a fired ceramic crock with a double lip that creates a valley around the top that can be filled with water to create a hermetic seal when the lid is placed on top.
For getting crock I used see:I put the shredded cabbage in the crock as it was sliced and cut and also sprinkled a portion of the salt, vinegar and caraway seeds at the start middle and end of filling the crock with the cabbage.
(http://www.amazon.com/The-Sausage-Maker-31001-Fermenting/dp/B00CXTEEO4)
About $50.
When all the cabbage is in the crock I mixed the ingredients with a wooden spoon and weighed the mix with stones made for the crock.
I then added enough filtered cool water to just cover all the cabbage leaves. I moved the crock to a shaded spot on our covered porch and filled the valley lip with water to seal it.
Four weeks later
Then I waited four weeks. Do not remove the top of the crock to see how the cabbage is doing on its journey to sauerkraut. You'll ruin the process.
You must check the level of water in the valley lip every few days. Depending the humidity in the air you may have to fill the lip that often. If it has been raining you may not have to for over a week.
Keeping the hermetic seal intact is an important part of the fermenting process. Occasionally the gases in the crock will lift the lid just enough for bubbles of gas to escape. That is normal.
There was a week when I was filling the lip valley about every other day.
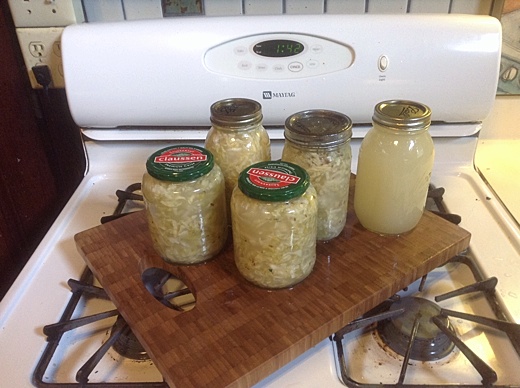
Image above: Four weeks later four quart bottles of kraut and one of "elixir" at right. Photo by Juan Wilson.
When the four weeks are I brought the crock back into the kitchen. If you live on the south or westside of Kauai you will probably have a film of red dust on the crock top and in the lip valley. I did.
I wiped off the dust and cleaned the top as I could. I carefully removed the top to keep any detritus from falling into the crock. I could then clean and wipe the valley more thoroughly before transferring the finished sauerkraut into bottles.
For this batch I had a variety of jars. Some were one quart Ball canning jars. These are available at Kauai Ace hardware stores and other locations. A couple of jars I had were one quart Clausen jars saved from the days I bought commercial pasteurized sauerkraut.
After washing my hands I grabbed the kraut from the crock and stuffed it into the jars. I was careful with the top kraut to pick out and dark spotted kraut that had been partially sticking out of the water at time time during fermentation.
After filling the jars with kraut I filled each jar to the brim with the juice that was left in the crock and then sealed the jar with its top. The remaining juice in the crock I bottled separately for a tonic drink alive with probiotics.
My son has done some delicious spicy kimchi fermentation. That might be the next thing I try to do with the crock.
See also:
Ea O Ka Aina: Fermaculture! 4/28/13
Ea O Ka Aina: Fermenting Sauerkraut 6/23/12
Ea O Ka Aina: Green Papaya Sauerkraut 10/14/09
.
2 comments :
Hi Juan, thanks for sharing your experiment with sauerkraut, that's a great idea. The store-bought kind is so expensive here and not as good. But your leading picture made me cringe: I once destroyed 50 years of seasoning on the cast iron skillet I inherited from my Grandma by cooking sauerkraut in it--that stuff is so acid. In my defense, I was young out of college and learning to cook.
Aloha Andy,
We use cast iron almost exclusively. We olive oil them after every use and frequently season our pots and pans. We use them with our gas stove and our wood burning stove.
We do not soak them in water. We usually can wipe them clean. If we need to we go to steel wool with as little water and mild soap. Them we dry and re-oil them.
I think prolonged contact with water is the worst enemy of cast iron. They should always be shiny and black.
IB Publisher
Post a Comment