SUBHEAD: This is a vintage food storage technique that our ancestors used - but is is safe?
By Steve Coffman on 5 August 2016 for off the Grid News -
(http://www.offthegridnews.com/off-grid-foods/vintage-canning-techniques-your-ancestors-used-but-are-they-safe/)
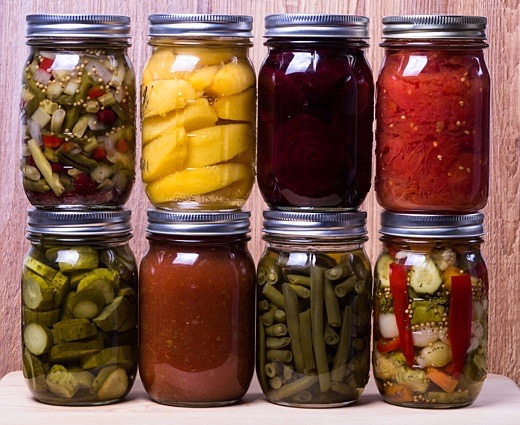
Image above: "Canned" vegetables in hermetically sealed glass jars for long term storage. From (http://blog.farmsreach.com/cottage-food-law-101-cooking-up-business-from-your-home-kitchen/).
Canning food in the modern world is easy. We have well-made jars, proven methods developed over a century and a half of trial and error, and the ability to consistently put up safe, nourishing and delicious food.
Even a century ago, canning was a well-established science, regardless of if you used Mason jars with zinc lids and rubber lids, or jars with glass lids and wire bails that locked down tight over a rubber ring.
The end result was the same, even if the methods were quaint and old-fashioned today. But prior to our WWII-era metal bands and disposable lids, and prior to the old Lightning jars with wire bails or their competitors, and prior to the earliest Mason jars, there were other methods, and that’s what we are looking at today.
In 1858, John Landis Mason patented the basic screwtop canning jar. It used a zinc lid and a rubber band to provide an airtight seal, and with only minor modifications this method would remain unchanged until WWII.
Mason revolutionized home canning with his simple invention, as it brought the reliability of consistently made canning jars, lids and rings into the public sphere for the first time. Prior to that, our ancestors had all manner of ways to put food up in glass and crockery jars.
Make ‘Off-The-Grid’ Super Foods Just Like Grandma Made!
In 1810, Nicolas Appert, a French inventor, worked out the idea of hermetically sealing food in jars after cooking it. His methods involved placing food in jars, corking it, sealing the cork with wax, wrapping the jar in cloth and then boiling it.
While science tells us now that the boiling of the jar essentially pasteurized it, Appert was unaware of the scientific reasons that ensured his method worked, only that it in fact worked. He was the first to put up food in glass jars, and he thought it was the exclusion of air that preserved the food (he was half right; the other half was in the boiling).
But prior to his efforts, people were still storing food in jars and crocks. The most common methods involved cooking food with a high sugar content or pickling them. In either case, the final product was placed in glass or crockery jars, and sealed in some form or another with glass, crockery, wooden or metal lids, wax, cloth or paper.
Here we see the origins of canned food, but grossly lacking in the kind of processing that allows for safe, long-term storage. Such foods relied on their ingredients, being closed off from the air and stored in a cool dark place, and some of them are considered unsafe today.
The mid- to late-19th century was a boomtime for canning jars and canning technology. Before the Mason jar, we would see “wax sealers,” which used a glass lid and ring of hot wax to provide an airtight seal. This technology is echoed by modern homesteaders who may still use wax to seal jars of jams and jellies.
It should be cautioned that wax-sealing of any sort, with or without a lid, was not always successful when it was in vogue, and should not be practiced now; it’s impossible to tell if you’ve gotten a good seal, and it’s easy to break the seal. I remember eating jams put up in wax-sealed jars by my grandmother, but I’d be hard-pressed to do it today.
The World’s Healthiest Survival Food — And It Stores For YEARS and YEARS!
Another common sort of jar was the “Lighting” or wire bail jar. Countless variations on this theme exist, ranging from the common sort we may know today to complex systems involving levers or even thumbscrews. All work on the same idea, though, of securely latching a glass lid over a rubber ring that has been sealed through boiling.
The harsh reality is until the 19th century, canning really didn’t exist, and food storage in jars, bottles and crocks was as much hit and miss, as accepting the fact you were stuck with heavily brined or sugared food. Modern concepts of sanitation did not exist, and stored foods were at a greater risk of loss through spoilage.
The current Mason jar, with its on-time use metal lid and reusable metal rings, represents the ultimate in home glass jar canning, and should be embraced with great vigor, due to the low cost, ease of use and proven sanitary track record. If you have older shoulder-seal jars like the old blue Ball jars, or wire bail seal jars, those are best left for decoration or dry storage, and given a gentle and loving retirement.
If you are looking to understand and practice home canning as done by our ancestors, then applying modern sanitary methods and storage, combined with well-made modern storage containers can be rewarding, but outside of an emergency, such methods should really only be practiced for entertainment. An exception could be argued in favor of certain pickling techniques, but those exceed the scope of this article.
Hundreds of companies made thousands of variations of canning jars through WWII, and many still survive today. They are a fascinating glimpse into a time in our nation’s history when self-reliance and sufficiency was an important part of many American’s lifestyles, and the ability to “put up” food for the winter could mean the difference between life and death.
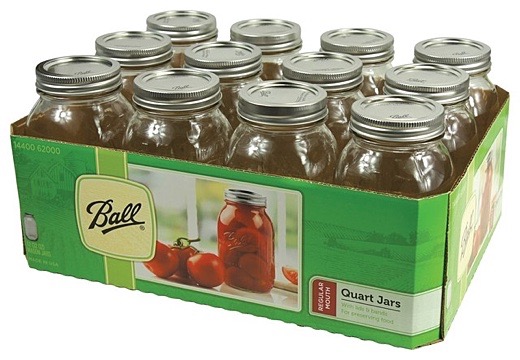
Image above: Box of a dozen one quart Ball canning jars available on Kauai from Ace Hardware. age. From (http://blog.farmsreach.com/cottage-food-law-101-cooking-up-business-from-your-home-kitchen/).
[IB Publisher's note: Mason style canning jars are available at many locations like supermarkets and hardware stores. On Kauai we have been buying boxes Ball brand half pint, pint quart and two quart jars and tops. Besides canning vegetables we have used these jars for years to store salt from Hanapepe Salt Pond without any corrosion on the inside of the caps.]
Canning Tomatoes
SUBHEAD: What your grandmother might not have told you about canning tomatoes.
By Kathy Bernier on 19 July 2016 for off the Grid News -
(http://www.offthegridnews.com/off-grid-foods/canning-tomatoes-heres-what-grandma-may-not-have-told-you/)
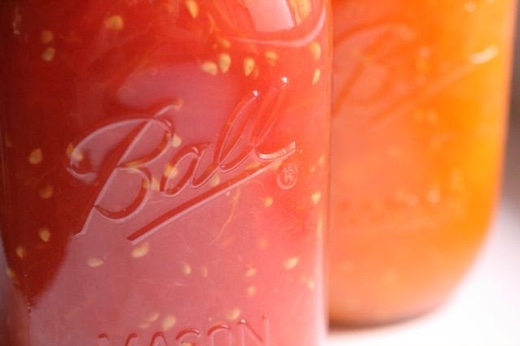
Image above: "Canned" tomatoes in glass jars. From original article.
It is never more gratifying to be a gardener than when luscious ripe tomatoes are rolling off the plants and into our kitchens. For most of us, though, there are often far more tomatoes than we can eat at the time. After slicing, sautéing, roasting, making salads and salsa, adding to pizza and ratatouille and grilled burgers, and filling the freezer with sauce, there is only option left.
It is time to can tomatoes.
People have been canning tomatoes for long enough that everyone and their great-grandmother—and I do mean that literally—has strong opinions on how it should be done. Some folks use strictly paste tomatoes, meaning only those varieties developed specifically for use in homemade sauces. Others use any varieties of tomatoes at all, from commercial or traditional to heirloom, in all shapes and sizes.
There is no single correct answer when it comes to the best tomato varieties for canning. The primary difference is that paste types usually have less water content and therefore require less reduction for sauces and ketchup. Taste, texture and personal preference are factors that matter.
The thing about canning tomatoes is that there are a lot of choices, not the least of which is whether to use a pressure canner or a boiling water bath canner. And the right answer to this question is that both methods are correct.
The Quickest And Easiest Way To Store A Month’s Worth Of Emergency Food!
This is unusual. For almost every other food, there is only one right choice. All vegetable, meats and seafood products need to be pressure-canned for safety. And while fruits can be processed using a pressure canner, it would diminish the quality of the product.
So why can tomatoes go either way? To explain, let me first talk about acid. The value of various foods are either very acidic—which registers very low numbers on the pH scale—or very neutral and registering very high pH numbers.
Almost all fruits range from 3.0 to 4.0 and are considered to be high acid. Vegetables range from 4.8 to 7.0 and are considered to be low acid.
And then there are tomatoes. The average tomato sits at 4.6, right on the cusp of high acid versus low acid. In this sentence, “average” is the key word. If the average is at 4.6, that means there are some varieties that are a tad more acidic, and a few—particularly some of the heirloom types—that are a little less acidic.
Therefore, the safety rule with tomatoes is to acidify them. By adding a little acidic content to every jar of canned tomatoes, we can be absolutely sure that they are adequately acid. Just a tablespoon of lemon juice or ¼ teaspoon of citric acid per pint of tomatoes does the trick. It is super easy, inexpensive and does not affect the taste of the finished product.
It may sound as if it is alright to skip the acidification step—adding the lemon juice or citric acid—if you are pressure canning, but that is not the case.
Acid needs to be added with both processes, and here is why: The directions and processing times for both canning methods have been tested using acidified tomatoes. If you do not use added acid, the processing times given may not be adequate.
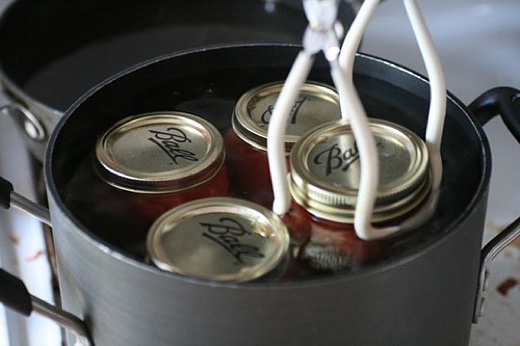
Image above: Using the boiling technique to preserve tomatoes for long term storage. From original article.
The major difference in canning tomatoes using the boiling water bath method versus pressure canning is processing time.
For example, tomatoes packed in water take 40-50 minutes (depending upon the size of the jars) in a boiling water bath canner and only 10 minutes in a pressure canner.
Tomatoes with no added liquid take a whopping 85 minutes in a boiling water bath canner and 25 minutes in a pressure canner. With crushed tomatoes, there is a huge time difference as well—35 to 45 minutes versus 15 minutes.
However, there is more than just processing time to consider. Using a pressure canner involves 10 minutes of venting, several minutes to build pressure, and more time to depressurize after processing. When you add it up, the actual time differences are less dramatic.
So why use a pressure canner for tomatoes? Many people say it is about the quality of the finished food. Pressure canned tomatoes often have brighter colors and flavors, retaining more of that tart zing that only a fresh backyard tomato can pack.
Prepare now for surging food costs and empty grocery store shelves…
Either way, there are some basics to go by. Following is a synopsis, although complete step-by-step directions can be found either in Ball’s Blue Book Guide to Preserving, which can be purchased for under $10 at most stores, or accessed free online at the National Center for Home Food Preservation.
I have canned many tomatoes and have used very nearly all of the permutations—with liquid and without, whole and crushed, boiling water bath or pressure canner processed. I admit that I do not have a single go-to way of doing it. An hour and 25 minutes is a long process time, but once it’s boiling, I can set it and forget it. Pressure-canned tomatoes do seem a little tastier, but it is more of a multi-step process than a boiling water bath. Crushed tomatoes are easier to pack into jars, but require more prep work and yield a product that I tend to use less in recipes. Most years, I do a variety.
Even though it seems a little more complicated at the outset, tomatoes are the perfect food for canning and are just right for those who prefer a wide variety of methods. And as long as you use an approved recipe, there is no wrong way to can garden-fresh tomatoes.
.
By Steve Coffman on 5 August 2016 for off the Grid News -
(http://www.offthegridnews.com/off-grid-foods/vintage-canning-techniques-your-ancestors-used-but-are-they-safe/)
Image above: "Canned" vegetables in hermetically sealed glass jars for long term storage. From (http://blog.farmsreach.com/cottage-food-law-101-cooking-up-business-from-your-home-kitchen/).
Canning food in the modern world is easy. We have well-made jars, proven methods developed over a century and a half of trial and error, and the ability to consistently put up safe, nourishing and delicious food.
Even a century ago, canning was a well-established science, regardless of if you used Mason jars with zinc lids and rubber lids, or jars with glass lids and wire bails that locked down tight over a rubber ring.
The end result was the same, even if the methods were quaint and old-fashioned today. But prior to our WWII-era metal bands and disposable lids, and prior to the old Lightning jars with wire bails or their competitors, and prior to the earliest Mason jars, there were other methods, and that’s what we are looking at today.
In 1858, John Landis Mason patented the basic screwtop canning jar. It used a zinc lid and a rubber band to provide an airtight seal, and with only minor modifications this method would remain unchanged until WWII.
Mason revolutionized home canning with his simple invention, as it brought the reliability of consistently made canning jars, lids and rings into the public sphere for the first time. Prior to that, our ancestors had all manner of ways to put food up in glass and crockery jars.
Make ‘Off-The-Grid’ Super Foods Just Like Grandma Made!
In 1810, Nicolas Appert, a French inventor, worked out the idea of hermetically sealing food in jars after cooking it. His methods involved placing food in jars, corking it, sealing the cork with wax, wrapping the jar in cloth and then boiling it.
While science tells us now that the boiling of the jar essentially pasteurized it, Appert was unaware of the scientific reasons that ensured his method worked, only that it in fact worked. He was the first to put up food in glass jars, and he thought it was the exclusion of air that preserved the food (he was half right; the other half was in the boiling).
But prior to his efforts, people were still storing food in jars and crocks. The most common methods involved cooking food with a high sugar content or pickling them. In either case, the final product was placed in glass or crockery jars, and sealed in some form or another with glass, crockery, wooden or metal lids, wax, cloth or paper.
Here we see the origins of canned food, but grossly lacking in the kind of processing that allows for safe, long-term storage. Such foods relied on their ingredients, being closed off from the air and stored in a cool dark place, and some of them are considered unsafe today.
The mid- to late-19th century was a boomtime for canning jars and canning technology. Before the Mason jar, we would see “wax sealers,” which used a glass lid and ring of hot wax to provide an airtight seal. This technology is echoed by modern homesteaders who may still use wax to seal jars of jams and jellies.
It should be cautioned that wax-sealing of any sort, with or without a lid, was not always successful when it was in vogue, and should not be practiced now; it’s impossible to tell if you’ve gotten a good seal, and it’s easy to break the seal. I remember eating jams put up in wax-sealed jars by my grandmother, but I’d be hard-pressed to do it today.
The World’s Healthiest Survival Food — And It Stores For YEARS and YEARS!
Another common sort of jar was the “Lighting” or wire bail jar. Countless variations on this theme exist, ranging from the common sort we may know today to complex systems involving levers or even thumbscrews. All work on the same idea, though, of securely latching a glass lid over a rubber ring that has been sealed through boiling.
The harsh reality is until the 19th century, canning really didn’t exist, and food storage in jars, bottles and crocks was as much hit and miss, as accepting the fact you were stuck with heavily brined or sugared food. Modern concepts of sanitation did not exist, and stored foods were at a greater risk of loss through spoilage.
The current Mason jar, with its on-time use metal lid and reusable metal rings, represents the ultimate in home glass jar canning, and should be embraced with great vigor, due to the low cost, ease of use and proven sanitary track record. If you have older shoulder-seal jars like the old blue Ball jars, or wire bail seal jars, those are best left for decoration or dry storage, and given a gentle and loving retirement.
If you are looking to understand and practice home canning as done by our ancestors, then applying modern sanitary methods and storage, combined with well-made modern storage containers can be rewarding, but outside of an emergency, such methods should really only be practiced for entertainment. An exception could be argued in favor of certain pickling techniques, but those exceed the scope of this article.
Hundreds of companies made thousands of variations of canning jars through WWII, and many still survive today. They are a fascinating glimpse into a time in our nation’s history when self-reliance and sufficiency was an important part of many American’s lifestyles, and the ability to “put up” food for the winter could mean the difference between life and death.
Image above: Box of a dozen one quart Ball canning jars available on Kauai from Ace Hardware. age. From (http://blog.farmsreach.com/cottage-food-law-101-cooking-up-business-from-your-home-kitchen/).
[IB Publisher's note: Mason style canning jars are available at many locations like supermarkets and hardware stores. On Kauai we have been buying boxes Ball brand half pint, pint quart and two quart jars and tops. Besides canning vegetables we have used these jars for years to store salt from Hanapepe Salt Pond without any corrosion on the inside of the caps.]
Canning Tomatoes
SUBHEAD: What your grandmother might not have told you about canning tomatoes.
By Kathy Bernier on 19 July 2016 for off the Grid News -
(http://www.offthegridnews.com/off-grid-foods/canning-tomatoes-heres-what-grandma-may-not-have-told-you/)
Image above: "Canned" tomatoes in glass jars. From original article.
It is never more gratifying to be a gardener than when luscious ripe tomatoes are rolling off the plants and into our kitchens. For most of us, though, there are often far more tomatoes than we can eat at the time. After slicing, sautéing, roasting, making salads and salsa, adding to pizza and ratatouille and grilled burgers, and filling the freezer with sauce, there is only option left.
It is time to can tomatoes.
People have been canning tomatoes for long enough that everyone and their great-grandmother—and I do mean that literally—has strong opinions on how it should be done. Some folks use strictly paste tomatoes, meaning only those varieties developed specifically for use in homemade sauces. Others use any varieties of tomatoes at all, from commercial or traditional to heirloom, in all shapes and sizes.
There is no single correct answer when it comes to the best tomato varieties for canning. The primary difference is that paste types usually have less water content and therefore require less reduction for sauces and ketchup. Taste, texture and personal preference are factors that matter.
The thing about canning tomatoes is that there are a lot of choices, not the least of which is whether to use a pressure canner or a boiling water bath canner. And the right answer to this question is that both methods are correct.
The Quickest And Easiest Way To Store A Month’s Worth Of Emergency Food!
This is unusual. For almost every other food, there is only one right choice. All vegetable, meats and seafood products need to be pressure-canned for safety. And while fruits can be processed using a pressure canner, it would diminish the quality of the product.
So why can tomatoes go either way? To explain, let me first talk about acid. The value of various foods are either very acidic—which registers very low numbers on the pH scale—or very neutral and registering very high pH numbers.
Almost all fruits range from 3.0 to 4.0 and are considered to be high acid. Vegetables range from 4.8 to 7.0 and are considered to be low acid.
And then there are tomatoes. The average tomato sits at 4.6, right on the cusp of high acid versus low acid. In this sentence, “average” is the key word. If the average is at 4.6, that means there are some varieties that are a tad more acidic, and a few—particularly some of the heirloom types—that are a little less acidic.
Therefore, the safety rule with tomatoes is to acidify them. By adding a little acidic content to every jar of canned tomatoes, we can be absolutely sure that they are adequately acid. Just a tablespoon of lemon juice or ¼ teaspoon of citric acid per pint of tomatoes does the trick. It is super easy, inexpensive and does not affect the taste of the finished product.
It may sound as if it is alright to skip the acidification step—adding the lemon juice or citric acid—if you are pressure canning, but that is not the case.
Acid needs to be added with both processes, and here is why: The directions and processing times for both canning methods have been tested using acidified tomatoes. If you do not use added acid, the processing times given may not be adequate.
Image above: Using the boiling technique to preserve tomatoes for long term storage. From original article.
The major difference in canning tomatoes using the boiling water bath method versus pressure canning is processing time.
For example, tomatoes packed in water take 40-50 minutes (depending upon the size of the jars) in a boiling water bath canner and only 10 minutes in a pressure canner.
Tomatoes with no added liquid take a whopping 85 minutes in a boiling water bath canner and 25 minutes in a pressure canner. With crushed tomatoes, there is a huge time difference as well—35 to 45 minutes versus 15 minutes.
However, there is more than just processing time to consider. Using a pressure canner involves 10 minutes of venting, several minutes to build pressure, and more time to depressurize after processing. When you add it up, the actual time differences are less dramatic.
So why use a pressure canner for tomatoes? Many people say it is about the quality of the finished food. Pressure canned tomatoes often have brighter colors and flavors, retaining more of that tart zing that only a fresh backyard tomato can pack.
Prepare now for surging food costs and empty grocery store shelves…
Either way, there are some basics to go by. Following is a synopsis, although complete step-by-step directions can be found either in Ball’s Blue Book Guide to Preserving, which can be purchased for under $10 at most stores, or accessed free online at the National Center for Home Food Preservation.
- Peel tomatoes by dipping in scalding water until skin loosens, plunge in ice water to make them cool enough to handle, and pull skins off. Trim ends. Cut or crush as needed for recipe.
- Prepare your canner and heat the water to simmering.
- Add lemon juice or citric acid to each jar.
- Pack tomatoes according to recipe: crushed, whole or halved packed in water or tomato juice, or whole or halved with no liquid added. Add salt if desired.
- Remove air bubbles, wipe rims, and adjust lids to finger tight.
- Process in either boiling water bath canner or pressure canner, following times and procedures for the one you are using.
I have canned many tomatoes and have used very nearly all of the permutations—with liquid and without, whole and crushed, boiling water bath or pressure canner processed. I admit that I do not have a single go-to way of doing it. An hour and 25 minutes is a long process time, but once it’s boiling, I can set it and forget it. Pressure-canned tomatoes do seem a little tastier, but it is more of a multi-step process than a boiling water bath. Crushed tomatoes are easier to pack into jars, but require more prep work and yield a product that I tend to use less in recipes. Most years, I do a variety.
Even though it seems a little more complicated at the outset, tomatoes are the perfect food for canning and are just right for those who prefer a wide variety of methods. And as long as you use an approved recipe, there is no wrong way to can garden-fresh tomatoes.
.
No comments :
Post a Comment